
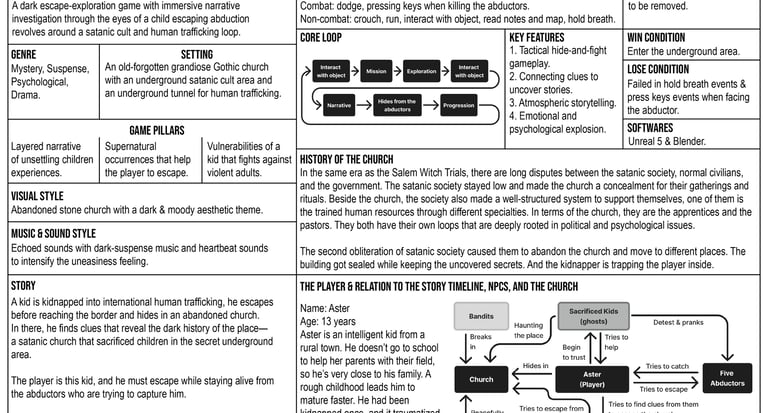
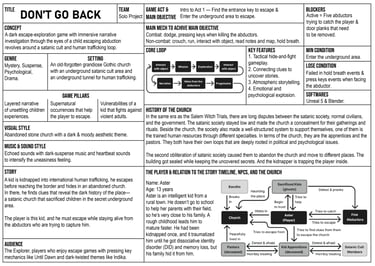
LD: BLACK PUDDLE II
Mystery, Suspense, Psychological, Drama

Notes:
The level design was developed along with the game writing aspect on the Black Puddle II page.
The final output of this project was a prototype phase, mainly focused on narrative, level design, environment design, and light design aspects. The programming side was not the priority.
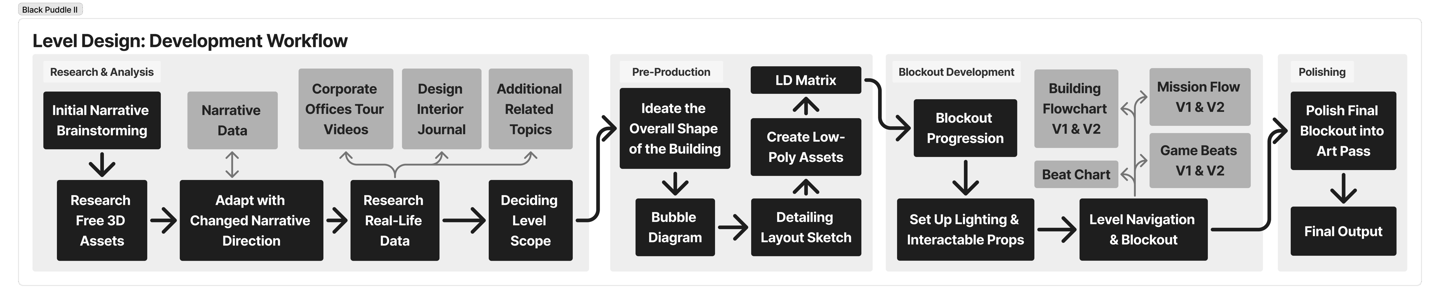
Initial Narrative Brainstorming

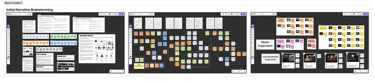
This project was a continuation of Black Puddle with its Taksa Semesta, so narrative continuity became the foundation for developing the level design. I did manual writing and used Miro to do brainstorming, you can read more on this page.
The idea developed into two world buildings with different gameplays: a 'nightmare' world that focused on escape with Indonesia-themed areas and a 'reality' world that focused on stealth and shooting with non-Indonesia-themed areas. It felt solid for both gameplay and narrative, so I proceed with this concept.
Research Free 3D Assets
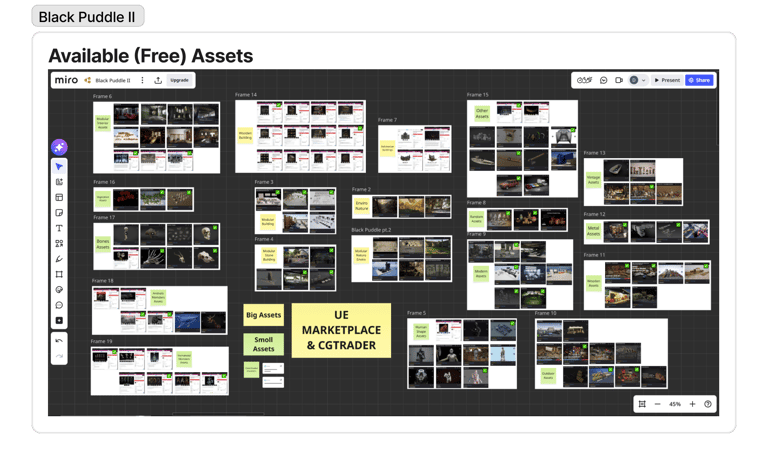

To know whether the idea was feasible to be made until the art pass prototype, I did research on FAB, Quixel, and CGTrader to find free assets that align with the narrative idea.
I tracked the resources using Miro and analyzed the assets' potentials. Most of them didn't align with the realistic visual direction that I aimed for. The Indonesia-themed assets to build the 'nightmare' world were also very limited and unfit for the narrative needs.
These limited resources made the narrative concept unfeasible. So, if I wanted to retain this concept, I could either make the suitable props by myself or pay someone to do it for me.
To solve this problem, I imagined this project as a real game that was developed by an interdisciplinary team and would be released. And it became clear that the most effective solution was to change the narrative instead of forcing the whole 3D pipeline to follow it.
Adapt with Changed Narrative Direction
The narrative concept went through massive changes to adapt to the available assets until it was realistically feasible to be made into an art pass without sacrificing the narrative quality.
Now, it only had one 'reality' world to be made into the level design, a fully indoor abandoned big corporate building that was being inhabited by mole people at night. The missions and story progression were adapted to this new concept. There wouldn't be separation between stealth / shooting / escape gameplay. And the narrative would focus on exploring A.C.A.B., corruption, and how those destroy people's lives.
Overall, the level design scope shrunk significantly to be feasible within the available assets and solo development situation.

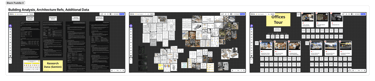
Analyze Corporate Office Tour Videos
Source: YouTube
Method: watched office tour videos (3 from Microsoft, 3 from Google, and 3 from Remedy Entertainment), analyzed how those places interact with humans and vice versa, and used sticky notes to write important observations / ideas that would be interesting to be implemented in the level design.
Learned: how real offices interact with people, differences between public and private areas, different priorities that shaped different needs and interior styles of each company, etc.
Research Real-Life Data


Learned A Design Interior Journal
Source: an interior design journal from a friend who was studying for a master's degree in interior design.
Method: It was the type of journal that demands prior knowledge of related fields to understand it, and I didn't have that. So, I inputted chapters that I’d be learning into Gemini, prompted it to make a summary in easy-to-understand words, learned and analyzed all of them, then created flowchart data using sticky notes in Miro.
Learned: ways to define power hierarchy in the corporate offices, psychological effects from the way areas were designed, open and private office breakdowns, etc.
Searched for Additional Related Topics
Sources: Google search & Gemini
Method: It was joint research for game writing aspects as well, so the narrative ideas were cross-checked through Google searches to know if they were realistic or not. But I got hyperfixated and perfectionistic, so I shifted to using Gemini to limit myself.
Learned: realistic references of gunshot sound travel distances, types and categorization of corporate rooms, gameplay duration based on the act, etc.
Decide The Scope of Building
The research data became the guidelines of how I should design the building, and the available resources curated what areas were possible to be made. I combined those data as a starting point to create the level.
Ideate the Overall Shape of the Building
At first, I tried to develop the layout from smaller areas into a bigger one, but I got overwhelmed since there was a lot of variety of rooms. So, I tried to design it from the bigger picture first: create the overall shape of the building.
I started the ideation from the narrative. Mental illness was an important theme, so it got me thinking, "What if the company's owner was an NPD, so he made the building follow the shape of his insignia?".
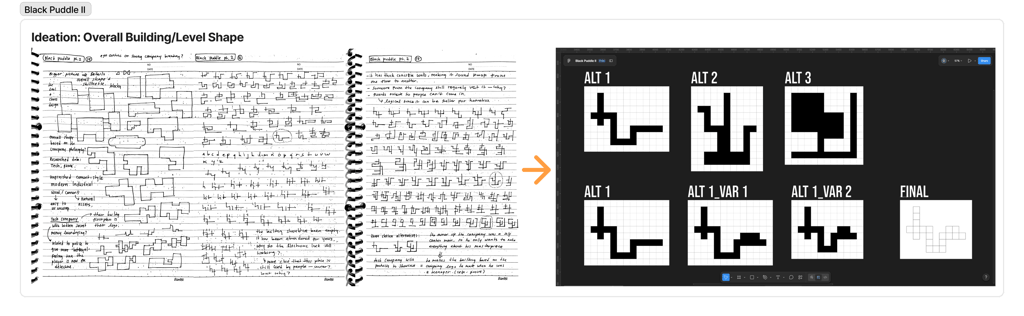

That concept strengthened the story and worldbuilding, so I went with that. I sketched 227 logos and curated them by picking simple shapes that were not too big, so it would be feasible to make them for this solo project.
Three alternatives were chosen and made into a grid layout prototype in Figma, and I picked one that has the best fit for the overall shape and proportion of each area. These final design became the hard level boundaries throughout the rest of the development process.
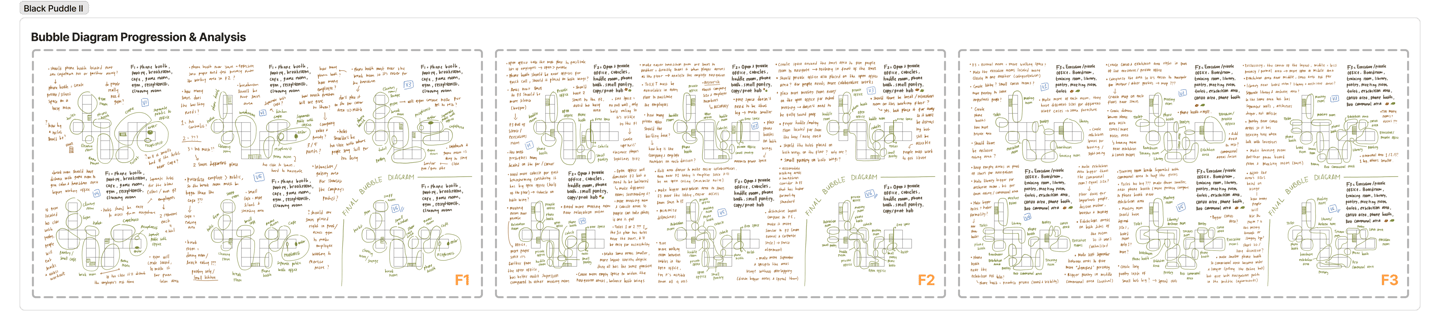
Bubble Diagram
To prevent another 'overwhelmed from how varied the rooms are,' I used a bubble diagram to design areas' shapes and separation. I processed the research data with resource availability, narrative progression, and mission flow to categorize areas on each floor.
Then, I did sketch and analysis to refine the sizes, shapes, placements, and number of rooms. In total, each floor passed five iterations (2nd solved problems from 1st, 3rd solved problems from 2nd, etc.) to make sure the final design facilitated the narrative, level design, and acceptable interior logic.
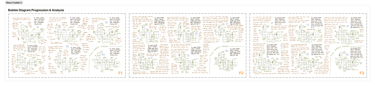
Detailing layout sketches
I proceed the bubble diagram into a detailed layout / props blocking. While working on it, I realized the clear grouping / area separations let me do a modular design, which would give more choices / variation to decide the final layout instead of designing each floor as a whole.
I went with that method, and it significantly increased the layout's quality, since I only needed to focus on small areas at a time. In total, I created six layout alternatives for each area on each floor. I picked one for each area based on interesting layout and navigation probabilities. Then, combine them into a full layout for each floor.

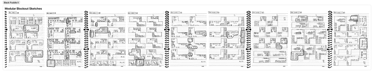
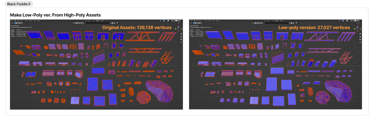
Create Low-Poly PROPS
The final layout sketches gave me ideas on what kind of 3D assets I needed for each floor. So, I did more research on FAB and Quixel Bridge, curated them to fit with the intended visual, and remade those game-ready assets inside Blender to be low-poly for the blockout process.
Those low-poly assets got exported into .fbx, imported into UE5, and given collision and world grid materials to avoid visual distractions.
lEVEL dESIGN mATRIX
My previous four solo projects (Black Puddle, Future Siren, Snow Church, Don’t Go Back) unconsciously taught me about the relations between prop dimensions, player's navigation / walk size, game mechanics, camera, and navigation layout that’ll affect gameplay.
Back then, I didn't think much of it. Only when I used LinkedIn did I learn those were called Level Design Matrix, which are widely used as standardization / guidelines for the whole development process. So, I tried to do it properly on this project.
I didn't know how a proper Level Design Matrix should 'be,' so I created it based on what works for me (it was a solo project after all).
Related to movements, I took notes of capsule collision's size (radius and height) on the Manny Blueprint made by Soriox for the minimum size of walkable areas.
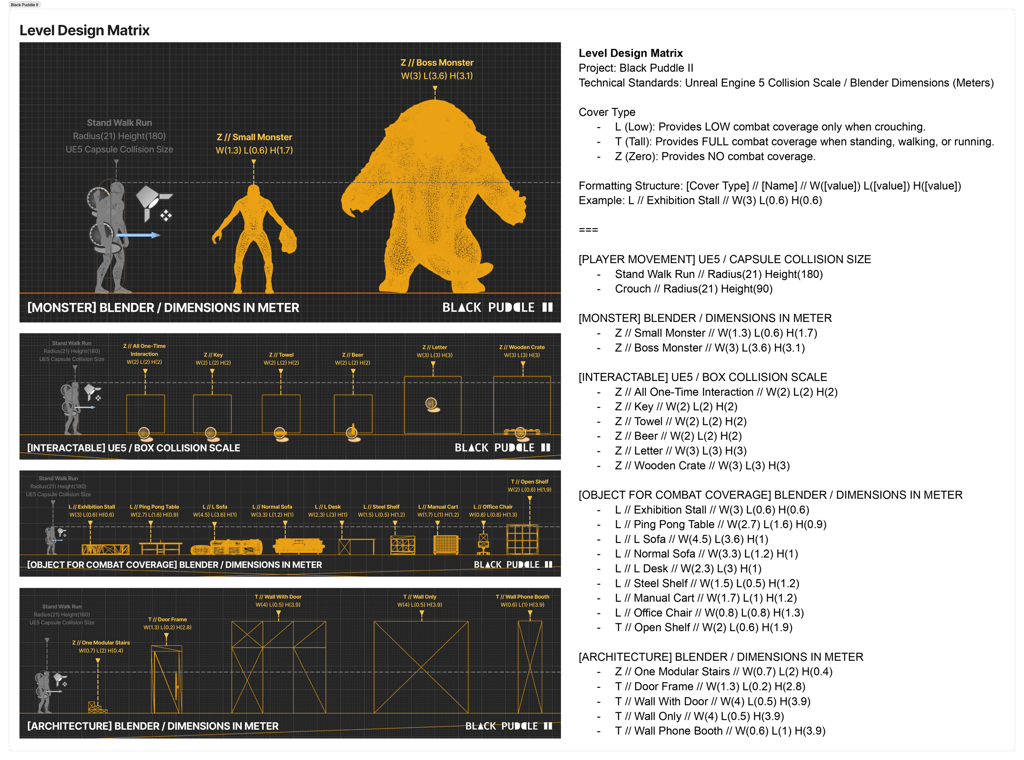
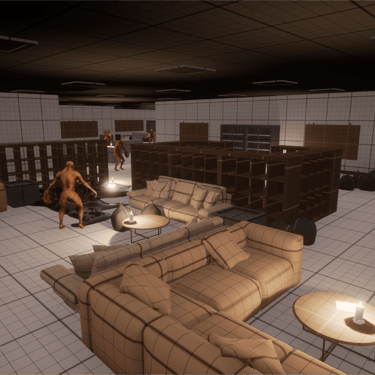
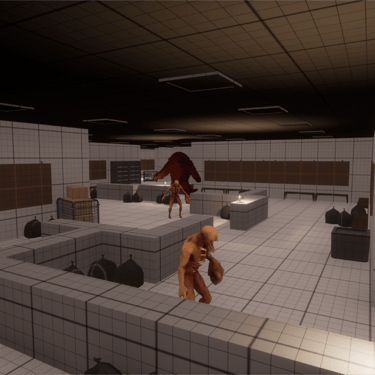
As for coverage for shooting gameplay, I noted down the props' dimensions inside Blender to know their exact collision size in UE5. This is also applicable for other assets that would heavily affect the exploration experience and visual environment. Meanwhile, the monsters' 3D models were placeholders since I didn't create one that fit with the narrative directions.
Those dimensions' data became the guidelines to arrange the assets inside the blockout phase.
Blockout Progression
Don’t Go Back taught me it's more efficient to create blockouts inside UE5 since it allows direct playtesting, so I can immediately know how the level and gameplay feel from the player's POV. I tried to do it, but it was hard since it was still the earlier implementation of layout sketches, so it needed tons of adjustment.
Instead of forcing myself on a method that slowed me down, I decided to do this through a method that worked for me: do it inside Blender.
I started with arranging props based on the final layout sketches. Then, created walking paths (referenced to the walking area's width in Black Puddle) while referring to the Level Design Matrix, created the building / architecture using modular assets, and exported it into .fbx to be playtested and refined in UE5.
In that process, I thought the level was enough to be built using the low-poly assets that I've made. IT WASN'T. Those assets mostly covered the architectural aspects, while the interior props had limited variety. So, I reused assets from Black Puddle and downloaded more free assets to fill the variety gap.
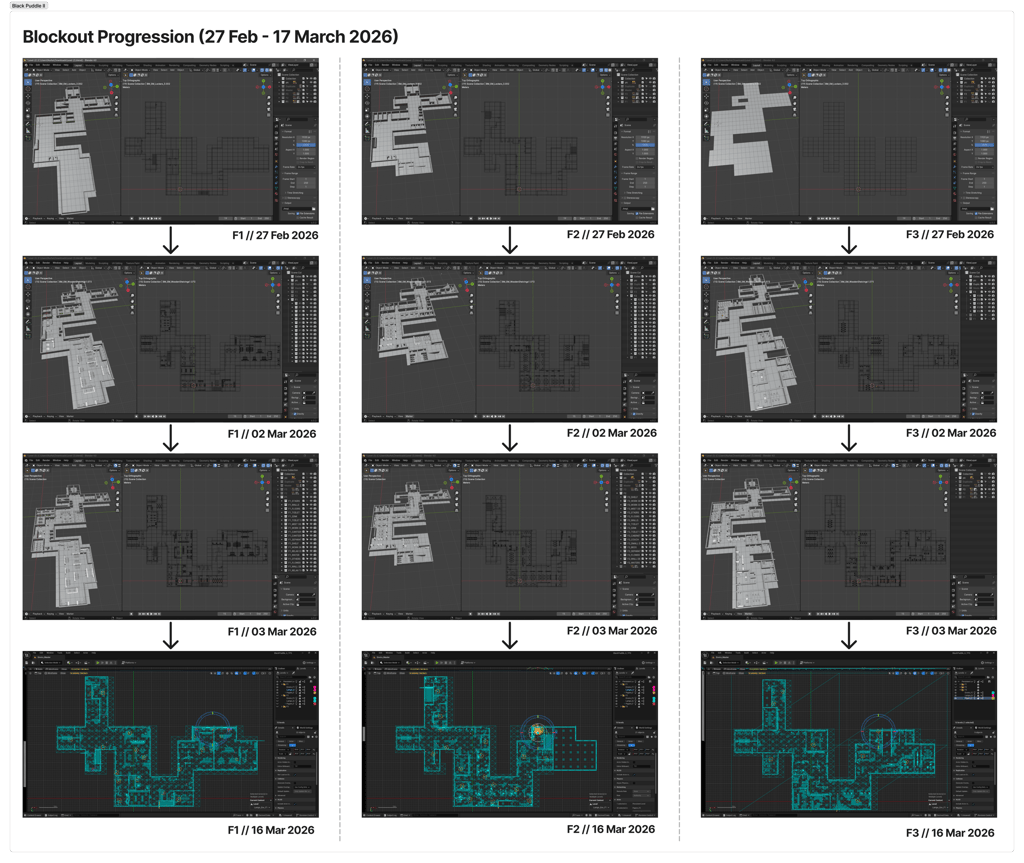
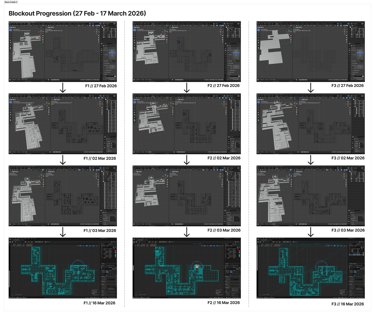
Ideally, those new free assets should be converted into low-poly first for engine optimization. But it would take a lot of time (and it was a solo project), which would extend the development time. So, I compromised by using the native assets BUT changed all PBR materials into world grid with simple colors. It gave me more time to focus on the blockout.
Overall, this blockout phase was focused on refining the interior layout, navigation feel, and architectural aspects to make sure every floor felt unique and delivered its design intentions.
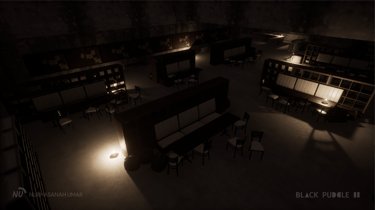
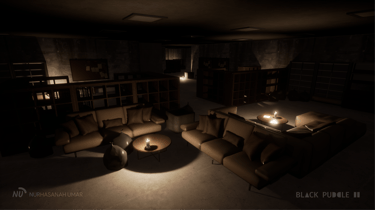
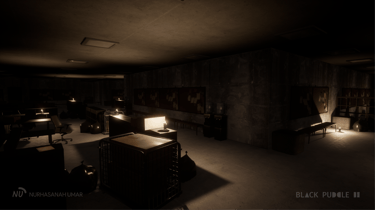
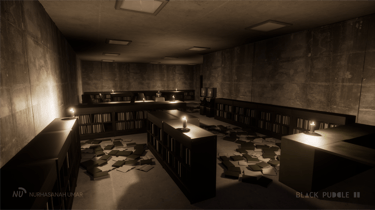
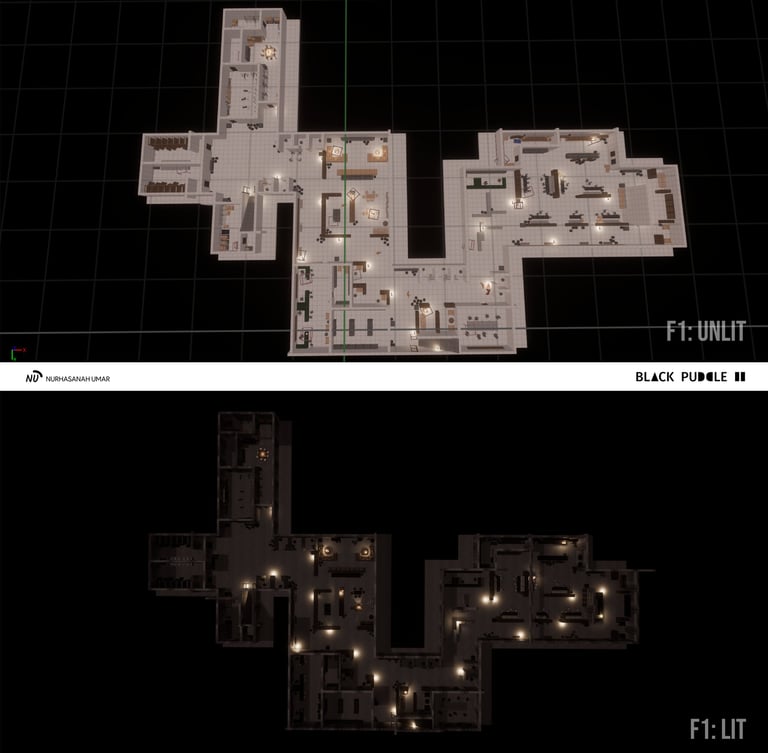
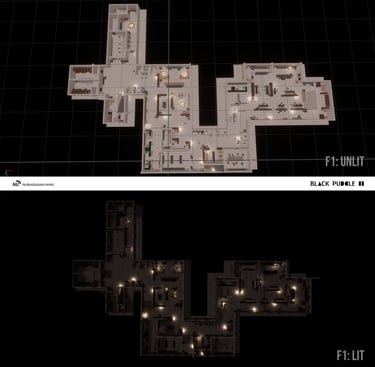
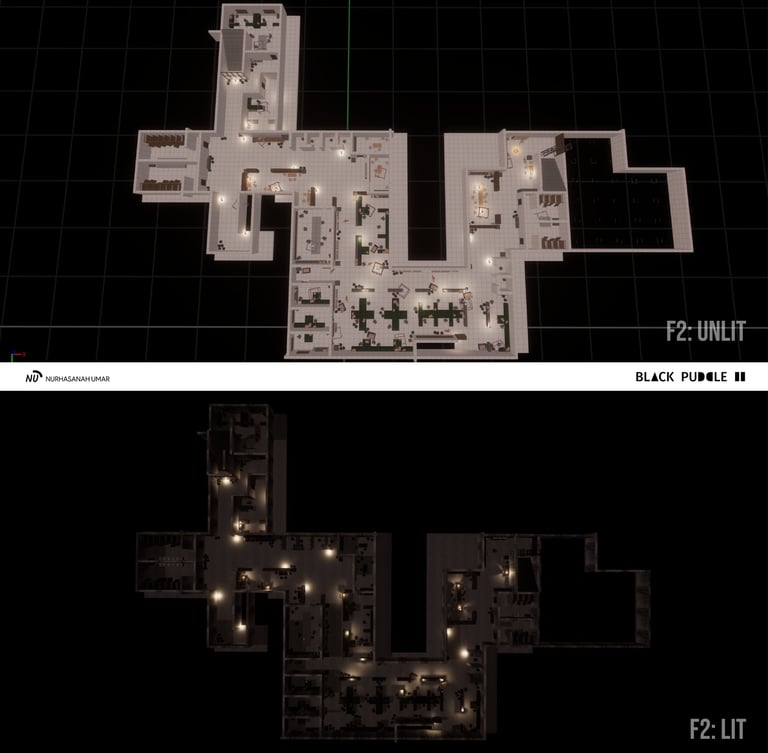
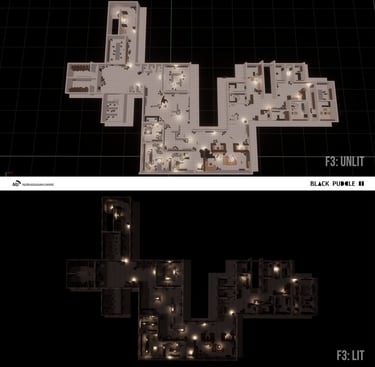
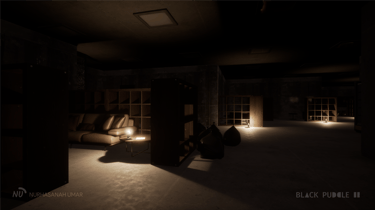
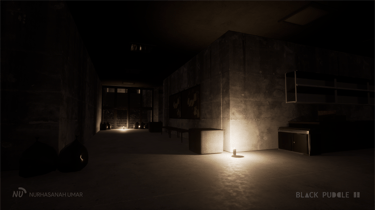
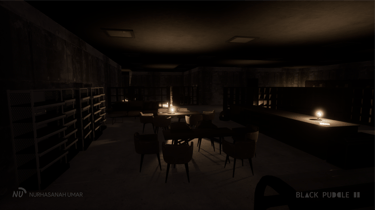
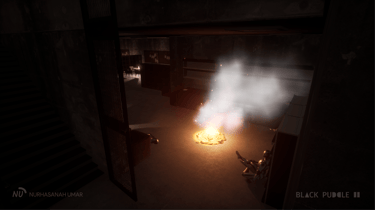
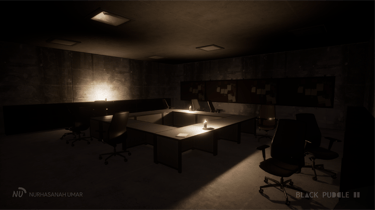
Set Up Lighting & Interactable Props
After finalizing the layout in UE5, I set up the lighting and interactable props to make the level interactive and fit with the intended ambiance.
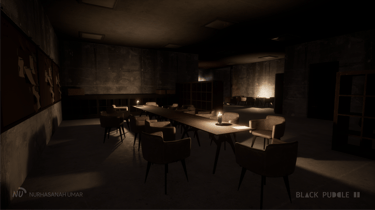
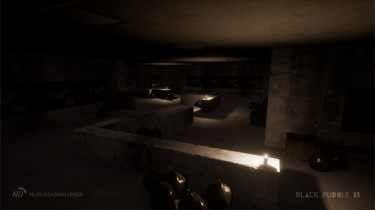
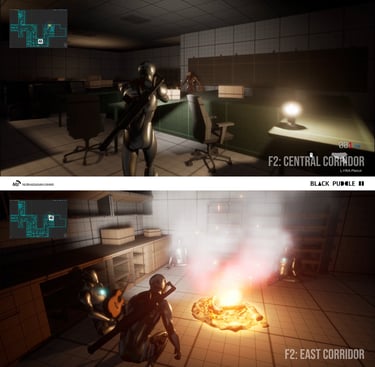
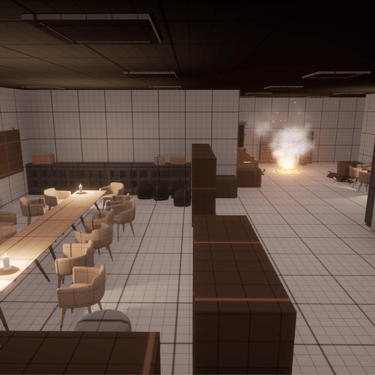
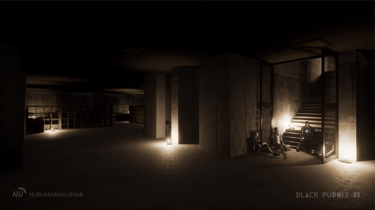
I started with a light setting. It was an abandoned building (no electricity) at night and got occupied by poor mole people. Portable lamps sound unrealistic for this narrative, so I used candles and a fireplace. The candles were placed on main explorable routes, places where NPCs gathered, accentuated important rooms, intensified tension, or even provided a 'safe' feeling before abolishing it. While the fireplace worked as a key area in F2.
Then, I set up the missions' interactable assets (beers, wood plank, towel, keys, etc.) and additional assets (papers left by employees) that encouraged exploration by rewarding the player with uncovering more backstories.
In terms of area variety, there weren't a lot of fundamental changes since it was already well planned in the bubble diagram, it was more like ‘the level naturally expanded inside the blockout to refine the gameplay’. And so, the changes were more towards props blocking, which wasn't inputted in the flowchart.
As for the flowchart, most of the changes were inside areas' categorisation, which resulted from adapting to the updated version of mission design, game beats, and beat charts. It didn't affect props blocking since I designed the narrative to adapt to the level design.
Overall, V2 has more interactable areas, room variety, better layout with intuitive navigation, and improved exploration compared to V1.
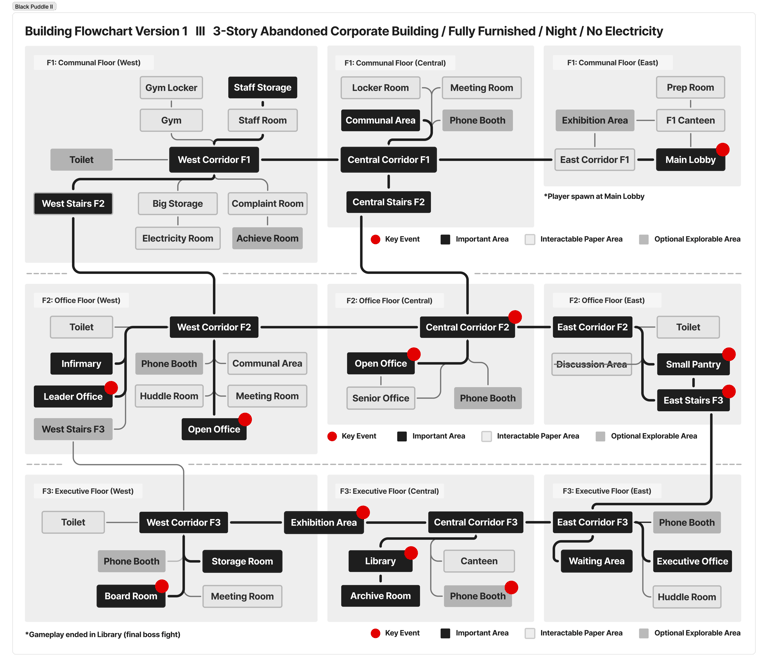
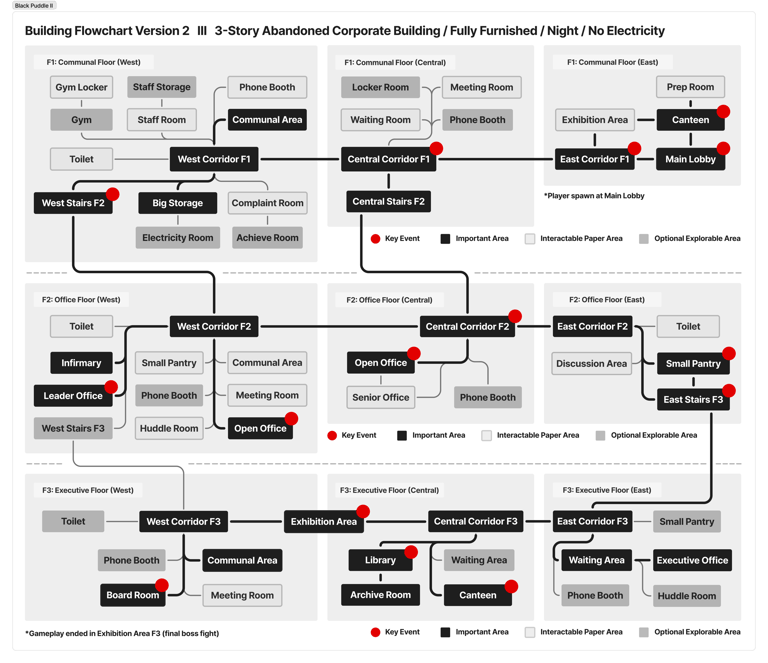
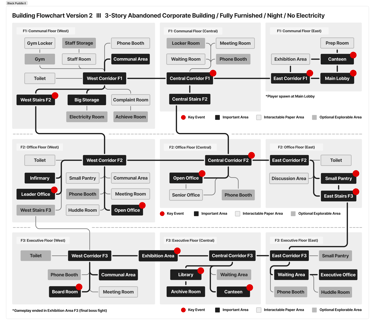
Level Flowchart V1 & V2
Gameplay-wise, this was a narrative-focused project, so the missions were designed to support the narrative. You can read more of the process on this page.
Initially, I tried to make the narrative to 'bring out the level design potentials' by designing the missions to explore every inch of each floor. The concept was good on paper, but it felt repetitive and overwhelming when it was being playtested. So, I redirected the 'forced player to explore everything' to 'guided player to inspect only certain areas'.
This newer concept gave player more choices and freedom, made the exploration happen more naturally, accommodated a wider spectrum of players, increased its replayability, etc. As for internal development, it really balanced the narrative and level design while also improving the gameplay experiences.
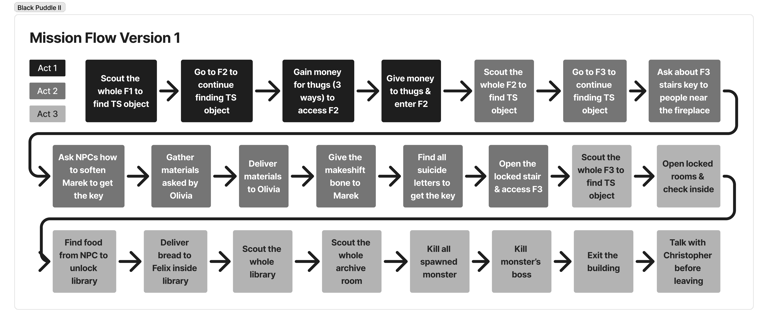
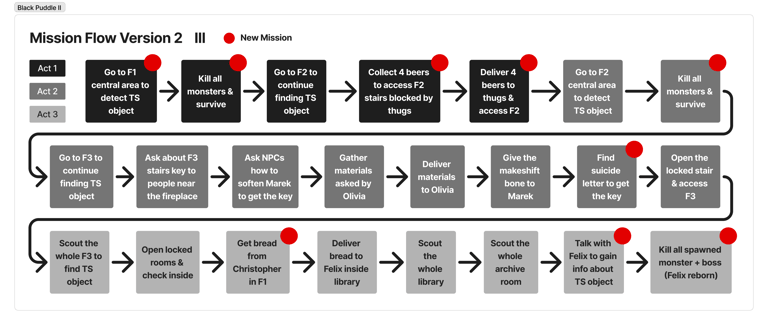
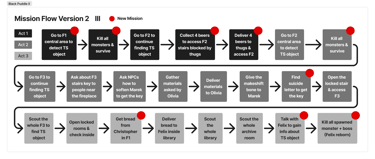
mISSION FLOW v1 & v2
I designed the game beat as a visual bridge between level design and game writing, so it went through massive changes from adapting to both development aspects.
V1 heavily leant towards exploration/narrative, as the shooting gameplay only happened at the end. The mission to unlock F2 was to gather money in multiple ways in F1. And there would be a mandatory 'inspect every room' on each floor. These repetitive tasks made the tension gradually increase, so there were no sudden spikes or unexpected events.
Meanwhile, the V2 was full of 'surprise' events through intense shooting gameplay that happened in a 'nightmare' world where it seamlessly blended with reality. The gathered money mission changed into collecting beers, massively shortening the gameplay duration to control the tension. And it got a more balanced gameplay between combat, exploration, and narrative in each act / floor.
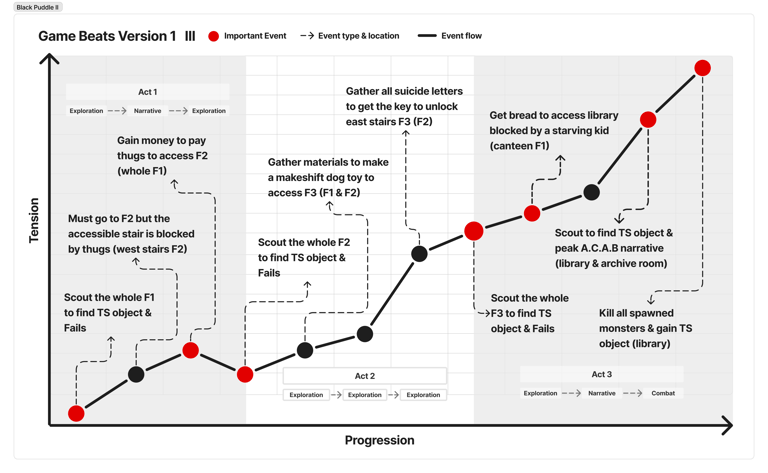
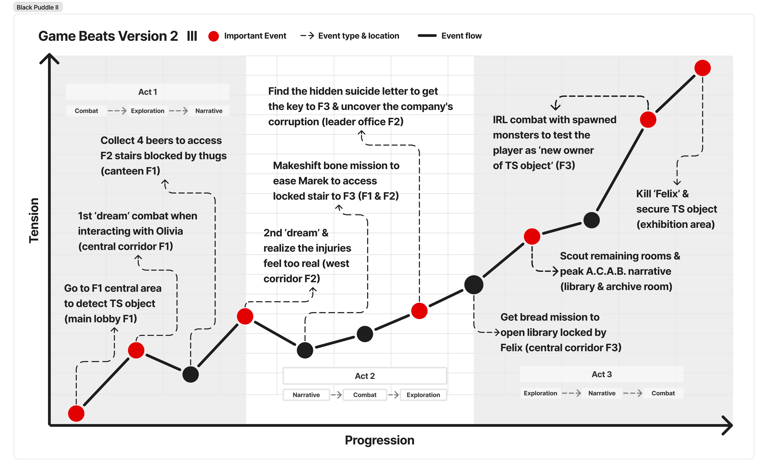

Game Beats V1 & V2
Since it was a solo project, I didn't need very up-to-date documentation. So, I only made the beat chart after finalizing the V2 of the level flowchart, mission design, and game beats.
Different from Don't Go Back, where there were new events when doing backtracking (which made each area need to be explained in detail), this project had more laid-back exploration. So, the mentioned areas on the table were where the key events happened. Player could also uncover additional backstories from the interactable papers scattered on all floors.
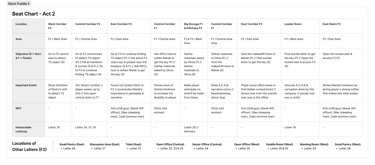
In total, there were 50 interactable letters across three stories' buildings. Each act had different gameplay flow and explored different floors (Act 1 in F1, Act 2 in F2, and Act 3 in F3).
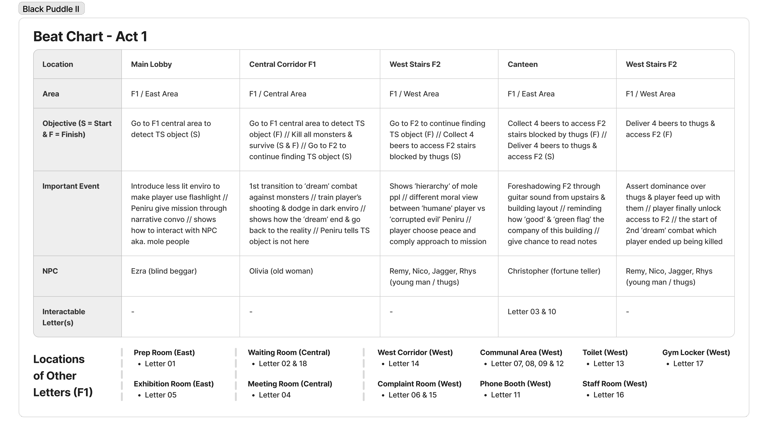
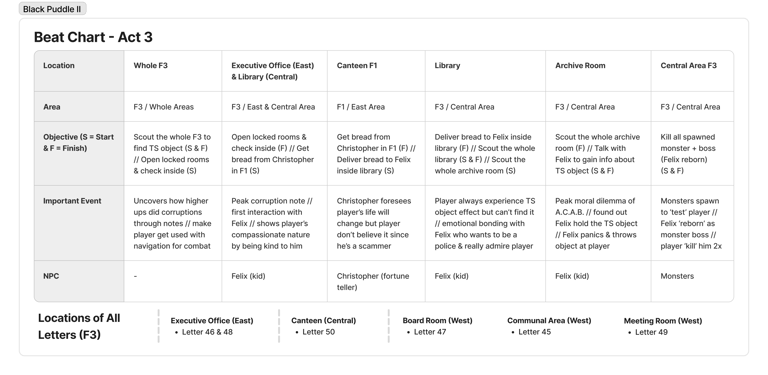

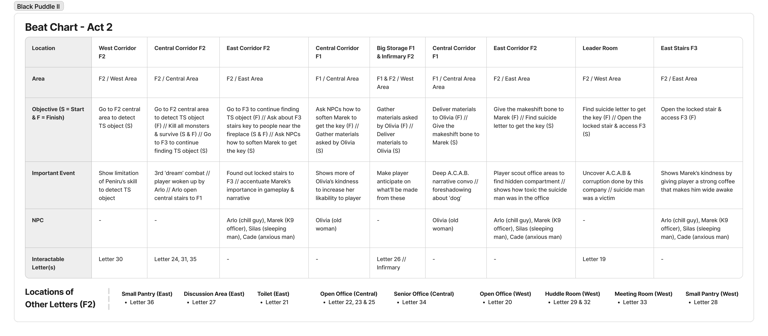
Beat Chart
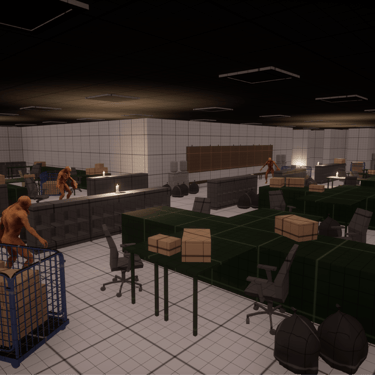
When the blockout phase finished, I continued it into the art pass. The transition was seamless and easier compared to Snow Church project, since in this project I didn't need to use foliage to fill in the 'space's emptiness'.
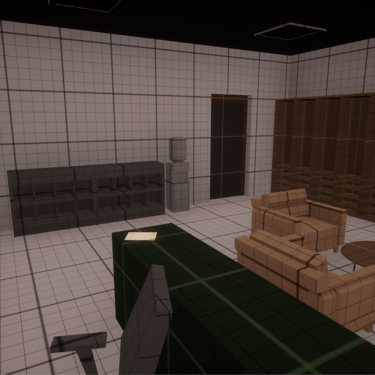
For the props, I only needed to replace all blockout meshes (low-poly) with the original static mesh (high-poly). Then, I adjusted the PBR materials on the original assets so they fit with the designated color palette that had been decided on the blockout phase.
Other materials from Quixel Bridge were used to set up the walls and floors so it fit with the art direction of 'abandoned buidling'. Fire particles were also downloaded from FAB to be used on F2 for the key area. I also set up the skylight intensity, contrast values in post-processing volume, added more ambience light to support the key light from candles, etc.
Polish Final Blockout into Art Pass
Final Blockout Breakdown


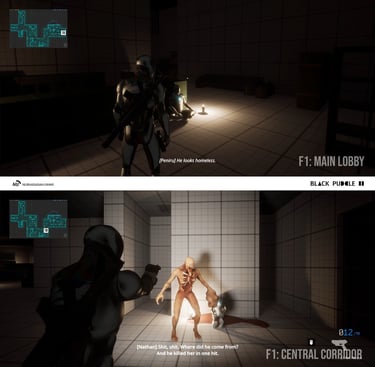


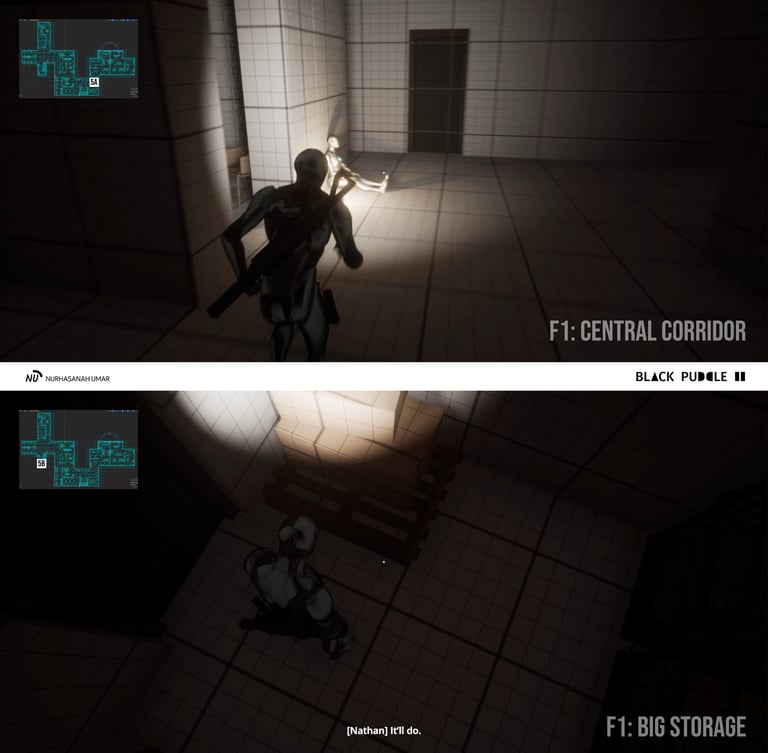
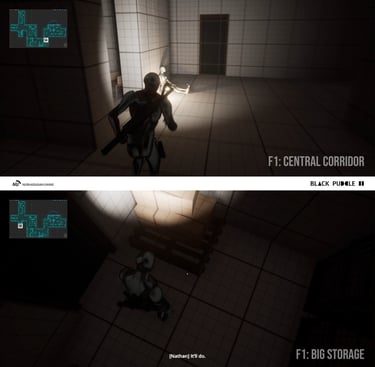
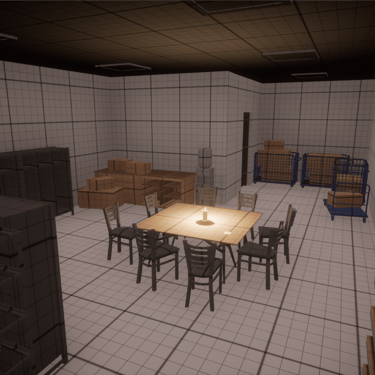
1A. Main Lobby (F1 / East Area) → Set up a low-light ambience to encourage navigation using flashlight mechanic, first interactable NPC and paper, and start of mission to go to the central area of F1 to scan for Taksa Semesta (TS) object.
1B. Central Corridor (F1 / Central Area) → Introduce an important NPC (Olivia) that triggers the 1st combat 'nightmare' to make the player get used to combat in a dark environment, and mission update to go to F2 to find the TS object.
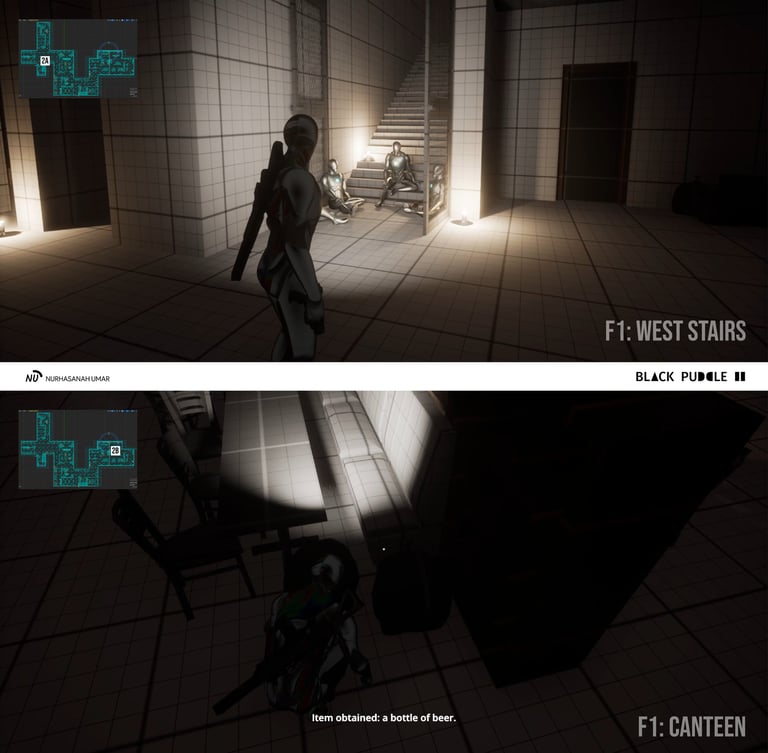
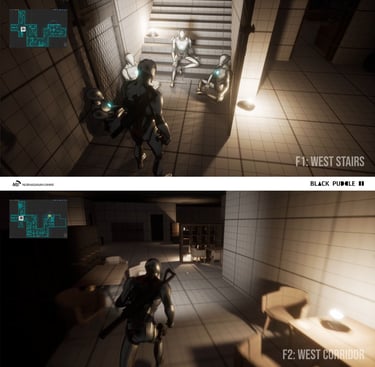
2A. West Stairs (F1 / West Area) → The player interacts with young thugs who blocked the only access to F2, narratively shows different moral views of the ‘humane’ player vs. the ‘corrupted evil’ Peniru, and updates the mission to get four beers in the canteen to access F2.
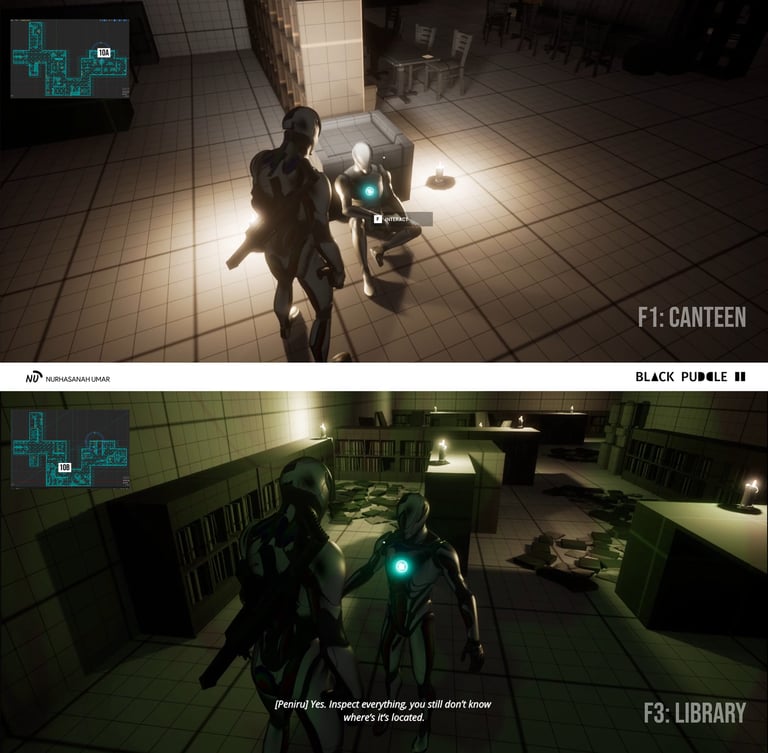
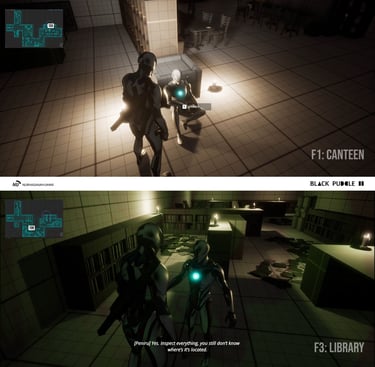
2B. Canteen (F1 / East Area) → Find four beers hidden between props, foreshadow F2 through guitar sound that's audible within the area, deepen narrative about 'green flag company' through interactable papers, and mission update to deliver the beers back to the thugs.
3A. West Stairs (F1 / West Area) → Narratively explain the player's insomnia that made him doze off and experience the 1st 'nightmare', and unplayable cutscene of the 2nd 'nightmare' that killed him and traumatized him to fear death.
3B. West Corridor (F2 / West Area) → Make the player get used to different props blocking, maintain tension from lingering fear of the 2nd 'nightmare', and mission update to go to the central area of F2 to find the TS object.
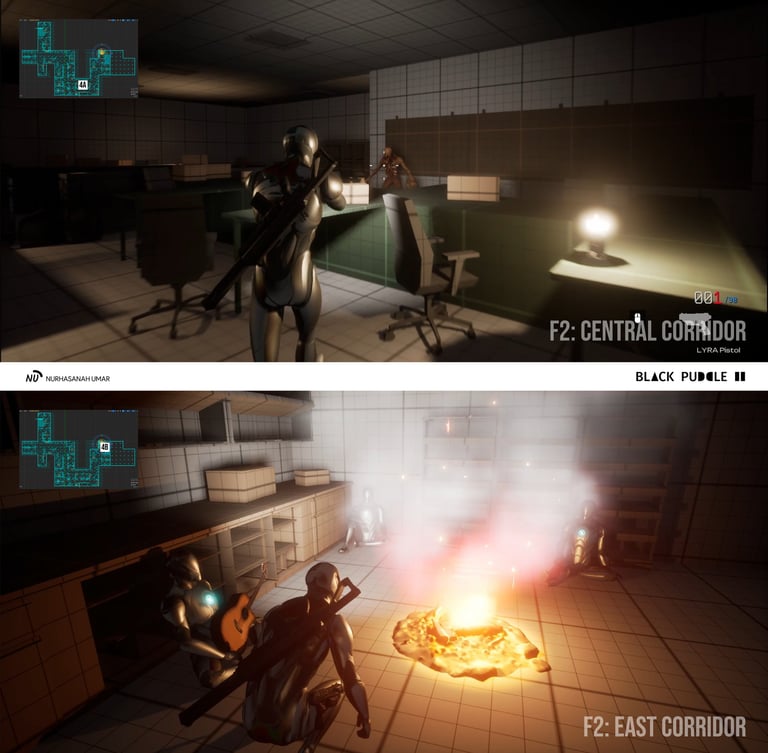
4A. Central Corridor (F2 / Central Area) → 3rd combat 'nightmare' with lots of low-coverage (crouch) props and maze-like navigation paths, the player got killed in a cutscene after combat, woken up by an NPC who plays guitar (Arlo) which also opened the central stairs access to F1, and mission update to go to F3.
4B. East Corridor (F2 / East Area) → Found out the stairs access to F3 is locked, interact with NPCs around the fireplace to ask about the key, introduce an important uncooperative NPC (Marek) that'll give the key, and mission update to ask around NPCs to soften him to get the key.
5A. Central Corridor (F1 / Central Area) → The player's determination persuaded Olivia to help him, highlighting her kindness that makes her an emotionally memorable NPC, and update mission to find materials: wood and cloth (making the player re-explore F1 and F2, increasing the chances to interact with papers to deepen the narrative).
5B. Big Storage (F1 / West Area) → The player found wood in a plank used to stack boxes.
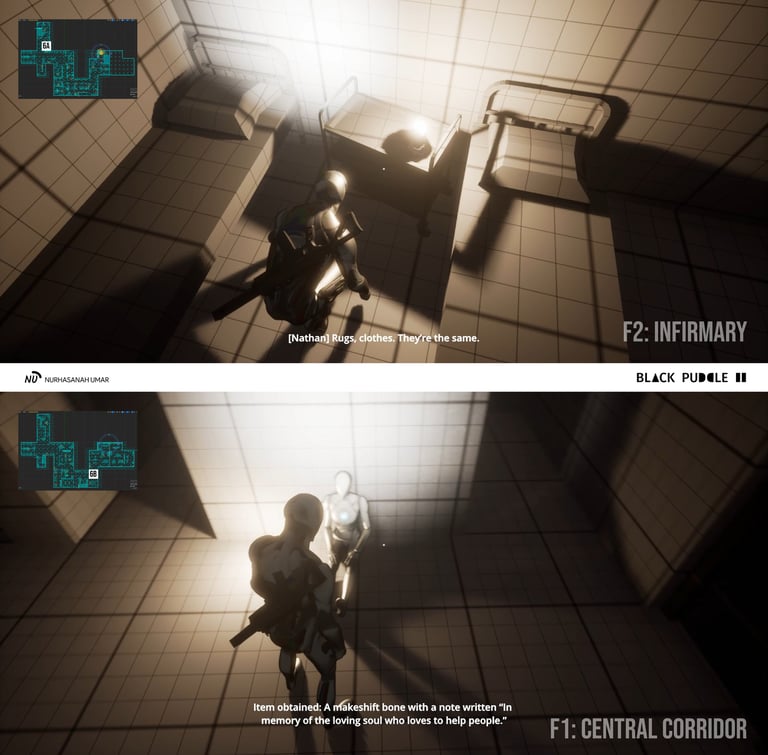
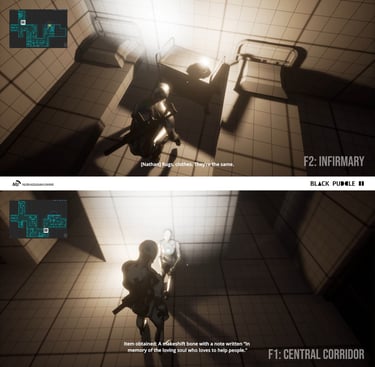
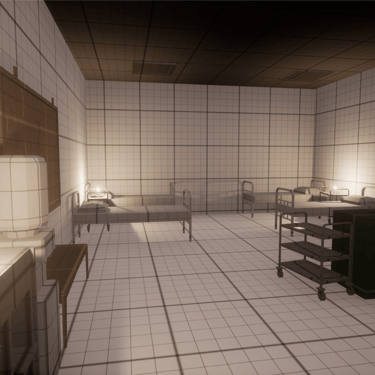
6A. Infirmary (F2 / West Area) → The player found cloth in the trolley, and update mission to deliver the materials back to Olivia.
6B. Central Corridor (F1 / Central Area) → Olivia crafts a makeshift dog toy from the materials, deepen A.C.A.B. narrative through Olivia's dark past with a police, and update mission to deliver the makeshift dog toy to Marek.
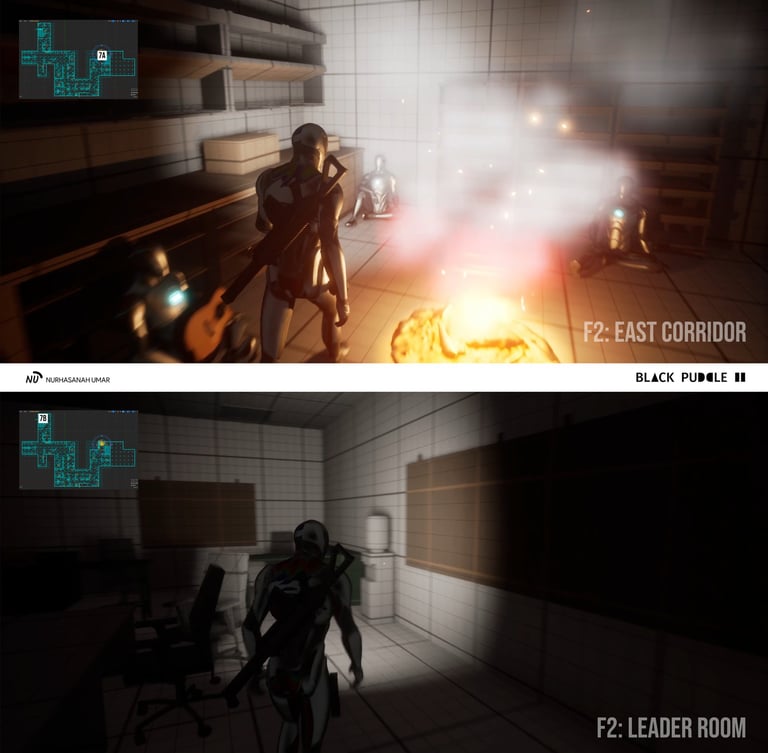


7A. East Corridor (F2 / East Area) → Deliver the toy to Marek, he gives a suicide letter that deepens the corruption narrative of this 'green flag company', and mission update to find a secret compartment where the key to unlock the stairs to F3 is.
7B. Leader Room (F2 / West Area) → The player found the secret compartment, cutscene of the second suicidal letter contains structured corruption that's backed up by A.C.A.B., moral conflict of victim vs. perpetrator of suicide man, and update mission to unlock the stairs to F3.
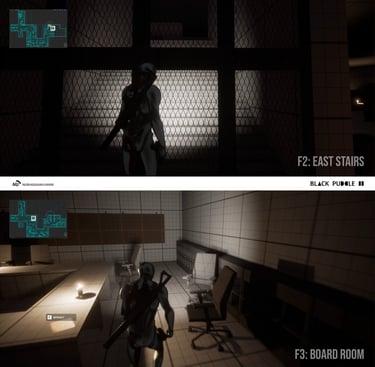
8A. East Stairs (F2 / East Area) → Unlock the stairs, unplayable cutscene Marek gives a potent coffee that makes the player wide awake and won't get another 'nightmare, and emotional bonding with NPCs who're victims of A.C.A.B and the world's unfairness.
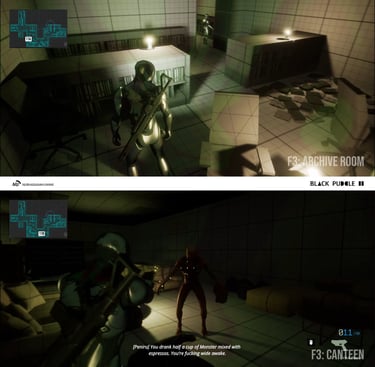
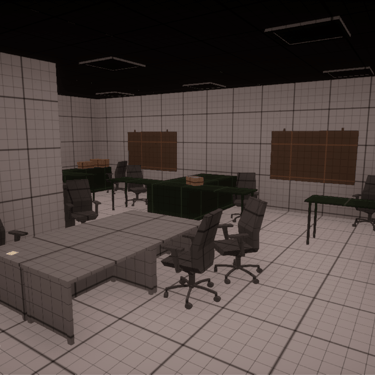
8B. Board Room (F3 / West Area) → One of the rooms has interactable papers that deepen the structured corruption narrative and ongoing mission to find the TS object that's located somewhere on this floor.
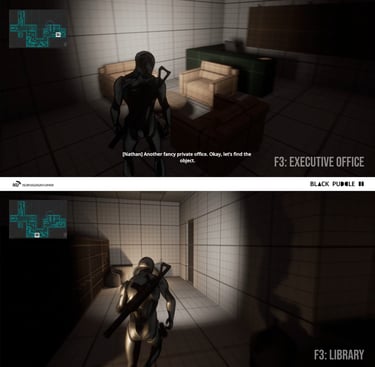
9A. Executive Office (F3 / East Area) → Peak corruption narrative through the interactable paper, and update mission to unlock the last locked room in F3 since no TS object has been found so far.
9B. Library (F3 / Central Area) → Cutscene of first interaction with kid NPC (Felix) when the player tries to break in, showing the player's compassionate side, and mission update to get bread from NPC in F1 (Christopher) to make Felix open the locked door.
Top-Down View: F1
10A. Canteen (F1 / East Area) → Gain bread in exchange for money, Christopher foresees the player's future (the player doesn't believe it), and mission update to deliver the breads to Felix.
10B. Library (F3 / Central Area) → Emotional bonding with Felix, moral conflict of Felix's belief that "all cops are good and I want to become one when I grow up" when the player knows about the real A.C.A.B. and corruptions they've done, and update mission to check the whole room to find the TS object.

Top-Down View: F2
Top-Down View: F3


11A. Archive Room (F3 / Central Area) → Peak moral conflict of Felix's believe with A.C.A.B., cutscene when the player finds out Felix holds the TS object and the player triggers Felix's bad memories that make him throw the object to the player and turn into a black puddle.
11B. Canteen (F3 / Central Area) → Cutscene of portals appears and monsters spawn from them, and IRL combat has few low-coverage props, a half-maze-like navigation path, and worsened visual and auditory hallucinations.
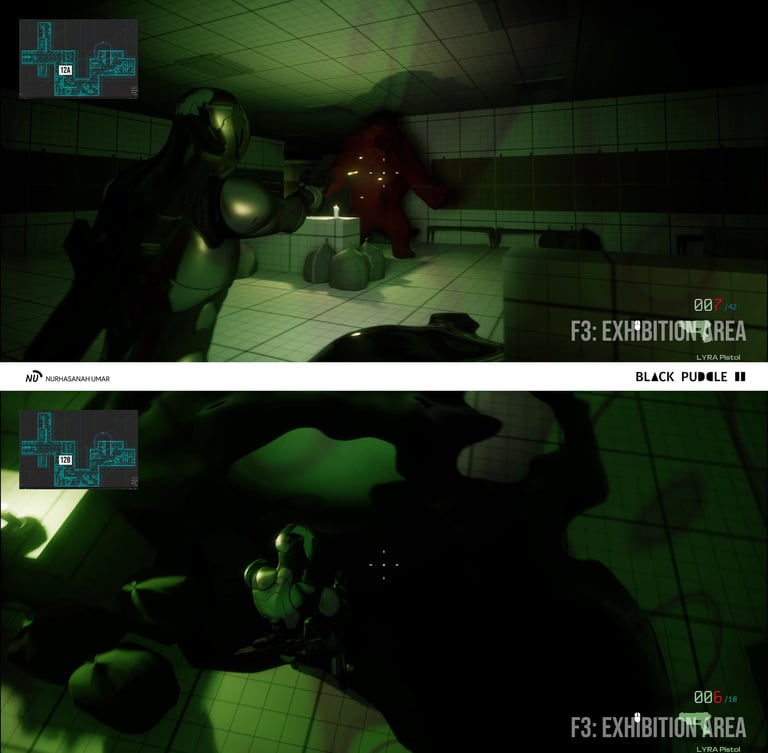
12A. Exhibition Area (F3 / Central Area) → The last weaker monster killed triggers the cutscene of Felix reborn into a monster, the final combat with heavy moral conflict inside a big area with few low-coverage props that let an adaptive approach to kill the enemy's boss.
12B. Exhibition Area (F3 / Central Area) → The player killed the boss which turned into a black puddle, the final cutscene showed the player going back to Christopher to talk about the right 'foresees' and found him dead, and the gameplay ended.
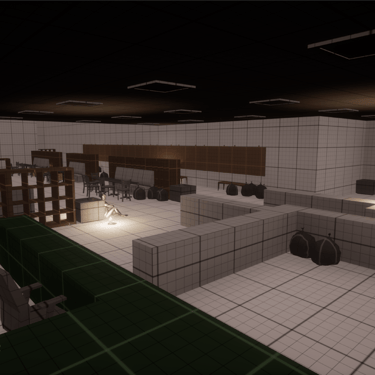
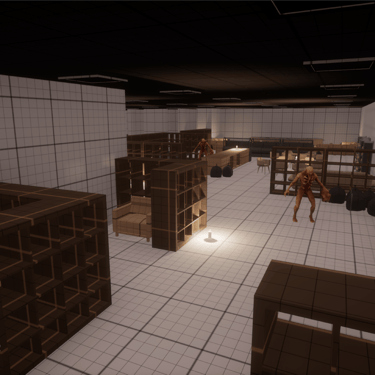
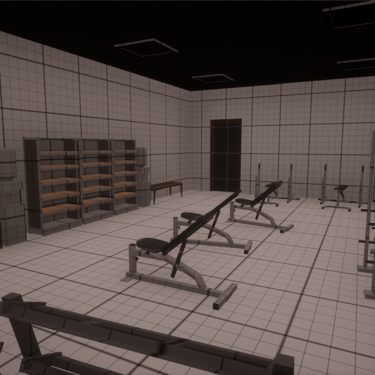
Blockout Render

Cinematic Render
One Pager
Playthrough (Blockout)
ART PASS

Things I’ve Learned
Sometimes flexibility > optimization since it can cut off development time and create a more effective workflow. I did it by using high-poly assets instead of manually remodeling them into low-poly mid-blockout development and changed the PBR materials into worldgrid.
Implementing IRL logic into level design helps to make the level more believable. For navigation, building layout, and props blocking, interior design helps a lot. Not everything must be 100% accurate with IRL logic; just take what is needed.
Light = wayfinding’s underdog. It plays with the psychological aspect of ‘light = safe place,' so it unconsciously guides the player to navigate by following the available lights, especially when not using the flashlight mechanic. It’s also logically more believable compared to using colors that don’t fit with the environment.
Be flexible with the documentation. Sometimes it’s unnecessary to create every document to be 'perfectly good-looking' since every idea is evolving. It’s okay to create it after major changes / once the design gets finalized.
The same assets can be repurposed in various alignments and placements to create different areas, so mastering the assets' usage and the area itself are mandatory. Make sure to create variations to avoid visual fatigue.
Always try to facilitate different player types, especially the polar opposite of the intended level, to make sure the gameplay is enjoyable for a wider audience. This avoids feeling too ‘inclusive’ / boring if the game played differently.
Resources
Third Person Shooter Kit by Soriox: https://youtu.be/BJlk0ha_FsM?si=juErAVGXFM7ZeBoH
Build a Detective's Office Game Environment: https://fab.com/s/2f39819b9b52
Apartment Tech Props: https://fab.com/s/a72cd33dbf80
Free Furniture Pack: https://fab.com/s/30988ec34e44
Grocery Store Props Collection: https://fab.com/s/57118a9df6b7
M5 VFX Vol2. Fire and Flames(Niagara): https://fab.com/s/2b919185c054
Coffee Shop Environment ( Coffee Shop Coffee Shop Coffee Shop Interior 3D Cafe ): https://fab.com/s/0673d885a064
LPGenericPropsSet02: https://fab.com/s/3b5a92feeeae
Mutant skeleton Free low-poly 3D model: https://www.cgtrader.com/free-3d-models/character/fantasy-character/mutant-5ed2b9de-daeb-4005-af3f-38875267be55
UDIM monster Free 3D model: https://www.cgtrader.com/free-3d-models/animal/other/udim-monster
Other assets and materials: Quixel Bridge, FAB, Unreal Marketplace
Audios: Epidemic Sound
© 2025 Nurhasanah Umar. All rights reserved.